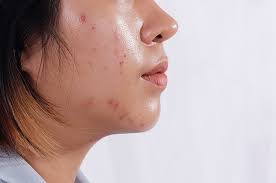
Having oily and acne-prone skin can be frustrating, but the right skincare routine can help keep breakouts and excess shine under control.
While store-bought products can be effective, they often contain harsh chemicals that might irritate sensitive skin.
A great alternative is DIY face masks made from natural ingredients that are gentle, effective, and budget-friendly.
In this guide, we will explore various homemade face masks that cater to oily and acne-prone skin, their benefits, and how you can incorporate them into your skincare routine.
Understanding Oily and Acne-Prone Skin
What Causes Oily Skin?
Oily skin results from overactive sebaceous glands that produce excess sebum.
While sebum is essential for keeping the skin hydrated and protected, too much of it can lead to clogged pores, breakouts, and a shiny complexion. Factors that contribute to oily skin include:
- Genetics
- Hormonal fluctuations
- Humid weather
- Overwashing the face
- Poor diet
Why Acne Occurs
Acne is a common skin condition that arises when hair follicles become clogged with oil and dead skin cells.
Bacteria can then multiply in these clogged pores, leading to inflammation and breakouts. Common causes include:
- Excess oil production
- Bacteria buildup
- Hormonal changes
- Poor skincare habits
- Stress and diet
Benefits of DIY Face Masks

Using homemade face masks has several advantages, including:
- Natural Ingredients: Free from harmful chemicals and artificial additives.
- Cost-Effective: Uses readily available kitchen ingredients, reducing expenses.
- Customizable: Can be tailored to your skin type and concerns.
- No Harsh Side Effects: Less likely to cause irritation compared to chemical-laden products.
Now, let’s explore some of the best DIY face masks to help combat oily and acne-prone skin.
Best DIY Face Masks for Oily and Acne-Prone Skin
1. Honey and Cinnamon Mask
Benefits:
- Honey has antibacterial properties that help combat acne-causing bacteria.
- Cinnamon improves blood circulation and helps reduce inflammation.
Ingredients:
- 1 tablespoon raw honey
- ½ teaspoon cinnamon powder
Instructions:
- Mix the honey and cinnamon until well combined.
- Apply the mixture evenly to your face.
- Leave it on for 10–15 minutes.
- Rinse with warm water and pat dry.
Use this mask twice a week to help control breakouts and soothe inflammation.
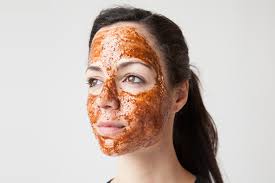
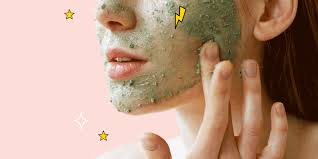
2. Clay and Apple Cider Vinegar Mask

Benefits:
- Clay absorbs excess oil and unclogs pores.
- Apple cider vinegar balances the skin’s pH and fights bacteria.
Ingredients:
- 1 tablespoon bentonite or kaolin clay
- 1 teaspoon apple cider vinegar
- 1 teaspoon water (if needed)
Instructions:
- Mix the clay and apple cider vinegar into a smooth paste.
- Apply an even layer to your face.
- Let it dry for 10–15 minutes.
- Rinse off with lukewarm water.
Use this mask once or twice a week to absorb oil and detoxify the skin.
3. Turmeric and Yogurt Mask

Benefits:
- Turmeric has anti-inflammatory and antibacterial properties.
- Yogurt contains lactic acid, which helps exfoliate dead skin cells.
Ingredients:
- 1 teaspoon turmeric powder
- 2 tablespoons plain yogurt
Instructions:
- Mix turmeric and yogurt into a smooth consistency.
- Apply to the face and leave it on for 15 minutes.
- Rinse with cool water and gently pat dry.
Use this mask once a week to brighten skin and reduce acne.
4. Oatmeal and Aloe Vera Mask
Benefits:
- Oatmeal absorbs excess oil and soothes irritated skin.
- Aloe vera hydrates and heals acne scars.
Ingredients:
- 2 tablespoons oatmeal
- 1 tablespoon aloe vera gel
- 1 teaspoon lemon juice (optional)
Instructions:
- Blend the oatmeal into a fine powder.
- Mix it with aloe vera gel and lemon juice.
- Apply to the skin and leave for 15 minutes.
- Rinse with lukewarm water.
This mask can be used twice a week for soothing and oil control.
5. Green Tea and Honey Mask

Benefits:
- Green tea has antioxidants that help reduce inflammation and fight bacteria.
- Honey keeps the skin hydrated while preventing acne.
Ingredients:
- 1 tablespoon brewed green tea (cooled)
- 1 teaspoon raw honey
- 1 teaspoon gram flour (optional, for thickening)
Instructions:
- Mix the ingredients into a smooth paste.
- Apply a thin layer to your face.
- Leave it on for 15–20 minutes.
- Rinse with warm water.
Use this mask once or twice a week to calm and refresh the skin.
Tips for Using DIY Face Masks Effectively
- Always start with a clean face to allow better absorption of nutrients.
- Do a patch test before trying any new ingredient to avoid allergic reactions.
- Use fresh ingredients to ensure maximum effectiveness.
- Avoid overuse—two to three times a week is usually enough.
- Follow up with a lightweight moisturizer to keep your skin hydrated.
FAQs: Common Questions About DIY Face Masks
1. How often should I use a DIY face mask for oily skin?
It depends on the mask, but generally, 2–3 times a week is ideal to balance oil production without over-drying the skin.
2. Can DIY face masks replace store-bought products?
DIY masks are a great addition to your skincare routine, but they may not completely replace other essential products like cleansers and sunscreens.
3. Will these masks work for sensitive skin?
Most of these masks contain natural ingredients, but always do a patch test first to ensure they do not cause irritation.
4. How long should I leave a mask on my face?
Most masks should be left on for about 10–20 minutes. Leaving them on too long can cause excessive drying or irritation.
5. Can I store leftover mask mixtures?
It’s best to use fresh masks, but some mixtures (like honey-based ones) can be refrigerated for up to 2–3 days.
Achieve Clearer Skin with DIY Face Masks
Taking care of oily and acne-prone skin doesn’t have to be expensive or complicated.
With natural ingredients readily available in your kitchen, you can create effective face masks that help balance oil production, unclog pores, and reduce breakouts.
By incorporating these DIY treatments into your skincare routine, along with a healthy diet and proper hydration, you’ll be well on your way to clearer, healthier skin!

 Bengali
 Gujarati
 Hindi
Hindi Kannada
 Malayalam
 Marathi
 Punjabi
 Tamil
Tamil Telugu